
Plus, receive recommendations and exclusive offers on all of your favorite books and authors from Simon & Schuster.
Boiling Eggs: A Primer
Eggs are a horribly misunderstood food. Almost all of us cook them at one time or another, and almost all of us cook them the wrong way.
I don't mean to get started on a bad foot. I'm not accusing you of crimes against food. I myself have hastily cooked eggs many times, but it's something I try to remedy every time I crack a shell.
Eggs are marvelously complex and compact, an intricate orb of proteins and fats bound together in a protective shell. I won't go into the composition of the egg here--I don't have the time to do it justice. But if you have a copy of Harold McGee's On Food and Cooking, I encourage you to read everything he says about eggs. If you don't have a copy of On Food and Cooking, I encourage you to buy it as soon as possible.
But what I will remind you of is how versatile eggs are. Eggs make some of our favorite foods possible--custard, mayonnaise, quiche, meringue, angel food cake--and eggs can be separated, making their protein-rich whites and much fattier yolks available for separate uses.
The key thing to remember about eggs for right now is that they begin to set at 145˚F. Thus, low and slow is almost always the best way to cook eggs. When scrambling or frying, use medium-low heat, and never boil eggs. At most, they should be very gently simmered.
My initial reason for looking into the best way to cook eggs is because I find that many recipes essentially tell you to overcook them. Even for something like deviled eggs, where you need firm whites and dry, crumbly yolks, there's just no need to cook eggs for 15 minutes or more.
Boiling Small Batches of Eggs
I took a dozen eggs and brought them to room temperature. I recommend this because the eggs are less likely to crack due to thermal shock when put into hot water or when brought to a boil. A quick way to bring eggs to room temp is to place them in a bowl of lukewarm water for about 5 minutes.
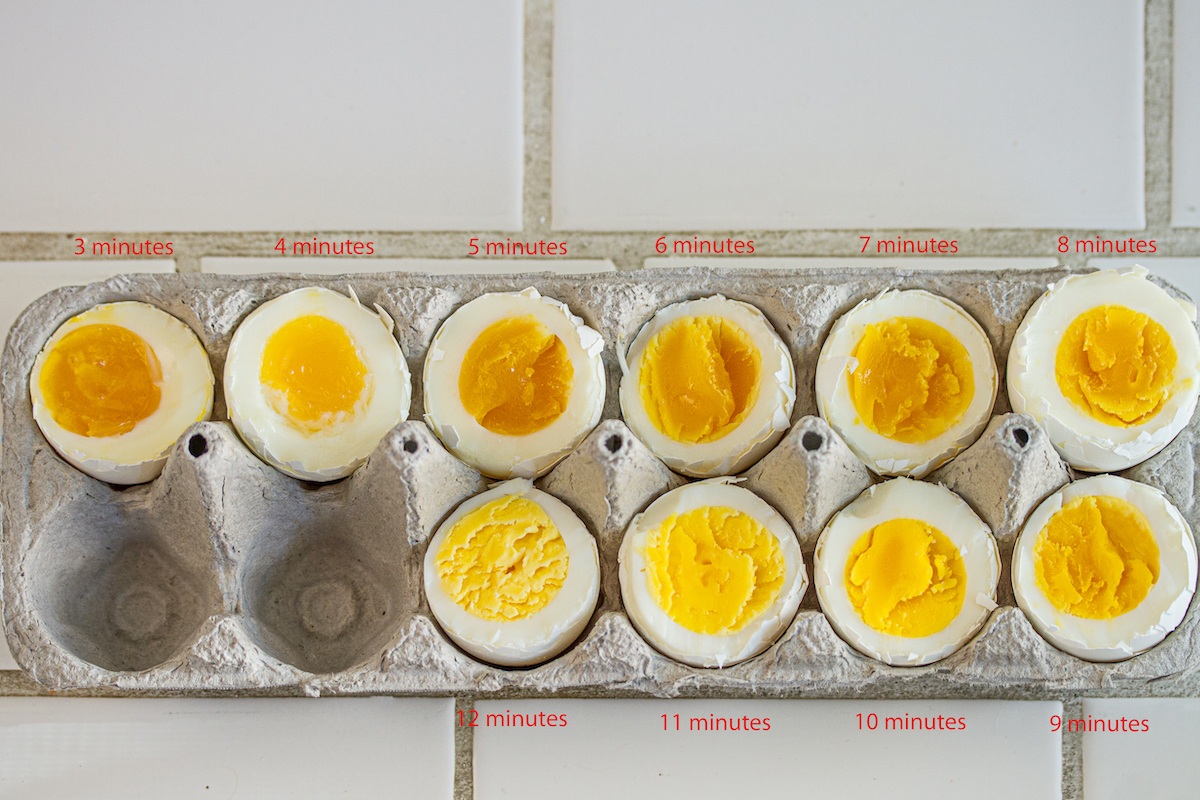
I then placed each egg individually in a small pot of water, brought the water just to a boil, then covered the pot and removed it from the heat. However, I let each egg sit in the covered pot, off the heat, for a different amount of time. I started with 3 minutes and increased the time by one minute for each egg. To stop the cooking, I immediately removed the eggs from the pan and put them in an ice water bath.
As you can (hopefully) see from the photos above, 3 minutes is the optimum time for a soft-boiled egg--one that you can eat with a spoon from an egg cup. 5 minutes achieves an egg with firm whites and a soft but not runny yolk (this is my preferred boiling time for eggs that will be going on salads or sliced on sandwiches). And starting at 8 minutes, you have eggs that are "hard-boiled." The 12-minute eggs still have smooth, not chalky, yolks, but I wouldn't go much above 12 minutes.
Of course, these times are for cooking one or two eggs at a time. If you pile a dozen eggs or more in a pot, the cooking time will be different. To make a larger batch of hard-boiled eggs, use a large pot--large enough so that the eggs are in a single layer. Cover the (room temperature) eggs with cool to lukewarm water. Bring the water to a boil, then cover the pot and remove it from the heat and wait 12 minutes. If you're skeptical, feel free to take an egg out of the pot at 12 minutes, run cold water over it, and open it up to see if it's done to your liking. It's much harder to overcook eggs with this method since you're not actually boiling them constantly, so even if you do leave your eggs in the pot for 15 minutes, you're not likely to get that green ring around the yolk and the sulfur smell that accompanies it.
For those cooking at high altitudes, give eggs more time in hot water because the boiling temperature of water decreases as altitude increases. For one to four eggs, bring the water to a rolling boil, cover the pot, and turn the heat down to its lowest setting for 12-14 minutes. For five to eight eggs, cook for 15 to 18 minutes. For nine to one dozen eggs, cook for 20 minutes. After cooking, transfer the eggs to a bowl of ice water. Depending on your altitude, you will have to experiment a bit to find the best timing for eggs cooked the way you like them.
Always put the eggs in a bowl of ice water to stop the cooking. Eggs are dense and will continue to cook even after you take them out of the pot, so to prevent overcooking, the eggs should be cooled as rapidly as possible.
To peel eggs without cursing profusely, start with older eggs. Eggs that are a few weeks old will peel much more easily than fresh eggs. This is because very fresh eggs have a lower pH than older eggs. As the pH increases (i.e. becomes more alkaline), the shell adheres less to the egg white, and thus the eggs are easier to peel. My favorite trick for peeling hard boiled eggs is to cool the cooked eggs down completely with cold water, then empty the water out of the pan, put the lid back on, and knock the eggs around inside the pan. Don't go crazy here--you want to break the shells all over, but not destroy the eggs. Once they're cracked, cover the eggs once again with cold water and let them sit for 5 minutes or so. Then, peel the eggs and rinse off any tiny shell fragments.
There are a few considerations I must make for folks with weakened immune systems, very young children, the pregnant, and the elderly (or anyone concerned about food safety). Having to be hyper-aware of the safety of what you eat doesn't mean that you have to overcook your eggs--you have some good options these days. At most grocery stores, you can find pasteurized eggs. These are eggs that have been gently heat-treated in the shell to kill salmonella and other potentially harmful bacteria. If you're craving a soft-boiled egg but can't abide the potential risks, pasteurized eggs are your answer.
And thus let it be said of me that I did not tell people to overcook their eggs. With the right knowledge of how to gently treat this fragile foodstuff, you can achieve perfectly cooked and delicious eggs with very little effort.
A New Generation of JOY
In the nearly ninety years since Irma Rombauer self-published the first Joy of Cooking, it has become the kitchen bible, with more than 20 million copies in print. This new edition of Joy has been thoroughly revised and expanded by Irma’s great-grandson John Becker and his wife, Megan Scott. They developed more than six hundred new recipes for this edition, tested and tweaked thousands of classic recipes, and updated every section of every chapter to reflect the latest ingredients and techniques available to today’s home cooks. Their strategy for revising this edition was the same one Irma and Marion employed: Vet, research, and improve Joy’s coverage of legacy recipes while introducing new dishes, modern cooking techniques, and comprehensive information on ingredients now available at farmers’ markets and grocery stores. Joy is and has been the essential and trusted guide for home cooks for almost a century. This new edition continues that legacy.
Get a FREE ebook by joining our mailing list today!
By clicking 'Sign me up' I agree to the Terms of Use and acknowledge the Privacy Policy and Notice of Financial Incentive. Free ebook offer available to NEW US subscribers only. Offer redeemable at Simon & Schuster's ebook fulfillment partner. Must redeem within 90 days. See full terms and conditions and this month's choices.